De TTGO T-Display van LilyGO is een microcontroller gebaseerd op een ESP32 met een ingebouwd 1.14 inch TFT kleurenschermpje. Via de USB poort is deze gemakkelijk te programmeren via de Arduino IDE.
Specificaties:
- Voedingsspanning: 3.3V DC of 5V DC
- GPIO Spanning: 3.3V*
- ESP32 chip (240Mhz dual core processor)
- SRAM: 520KB
- Flashgeheugen: 4MB
- Ingebouwde Wi-Fi
- Ingebouwde Bluetooth
- Ingebouwd 1.14 inch (240×135) TFT (IPS) display (ST7789)
- 2 x drukknop
- Ingebouwd Li-ion/Li-Po batterij oplaadcircuit: TP4054 chip kan tot 500mA laden
- Batterij connector: 2p Molex Picoblade
- Afmetingen: 51.4 x 25.2mm
Bron : YouTube video https://www.youtube.com/watch?v=UE1mtlsxfKM
Getting started with ESP32 development using the TTGO T-DISPLAY van Retro Tech & Electronics
Installatie van de programmeer omgeving
- Installeren van de Arduino IDE op een Windows PC.
Ga via de browser naar het website adres : https://www.arduino.cc/en/software
Download het programma ‘arduino-1.8.19-windows.exe’.
Dubbelklik het bestand om het uit te voeren en de software van de Arduino ontwikkelomgeving op je PC te installeren.
2. Dubbelklik op je bureaublad van je PC de nieuwe snelkoppeling Arduino 1.8.9 om de programmeeromgeving (IDE) te openen.
3. In de Arduino IDE moet je eerst instellen voor welke microcontroller je programma’s wil schrijven.
Kies in het menu : Bestand – Voorkeuren
In het tabblad ‘instellingen’ geef je in het vak ‘additionele board beheer urls‘ het internetadrezs op naar het package bestand van de Espressif ESP32 microcontroller nl. :
‘https://raw.githubusercontent.com/espressif/arduino-esp32/gh-pages/package_esp32_index.json’
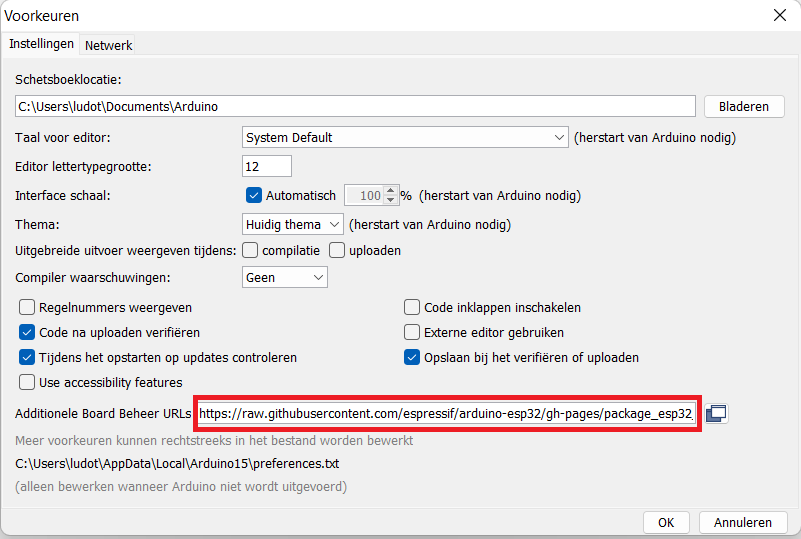
Opm.: De link naar ‘meer voorkeuren’ leiden naar een lijst van 3rd party board die worden ondersteund door de Arduino IDE : https://github.com/arduino/Arduino/wiki/Unofficial-list-of-3rd-party-boards-support-urls
Daar vind je de url naar het Espressif ESP32 jsonbestand op de github server.
4. Installeer nu de nodige bestanden van ESP32 module in via het menu : Hulpmiddelen – Board beheer
Type in zoekkader in : ‘ESP32’
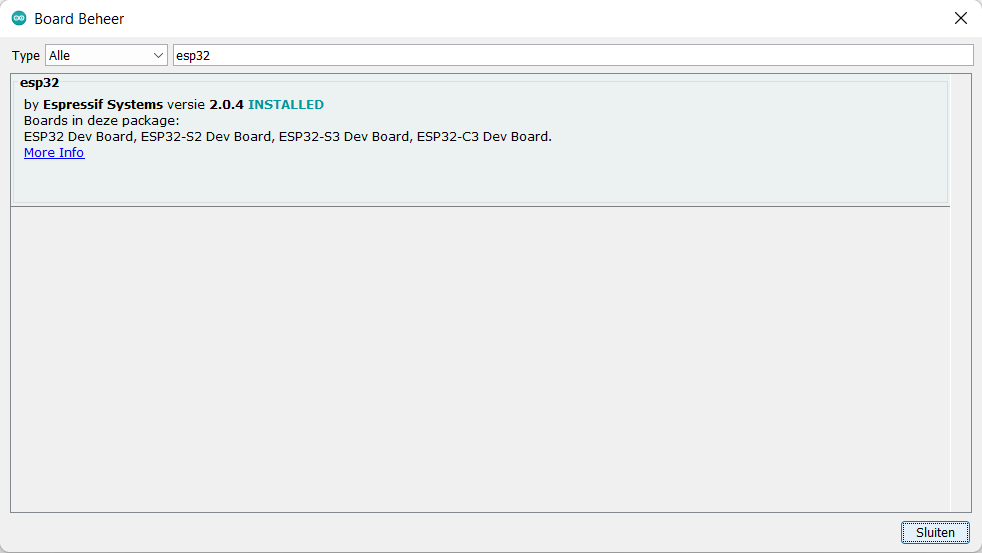
Kies in de lijst voor : ESP32 by Espressif Systems en klik op de knop ‘installeren’
Het uploaden van de 7 bestandsmappen via het internet duurt enkele minuten.
5. Stel het juiste board-type van de microcontroller in
Menu : Hulpmiddelen – Board – ESP32 Arduino – ‘TTGO Lora32-OLED’
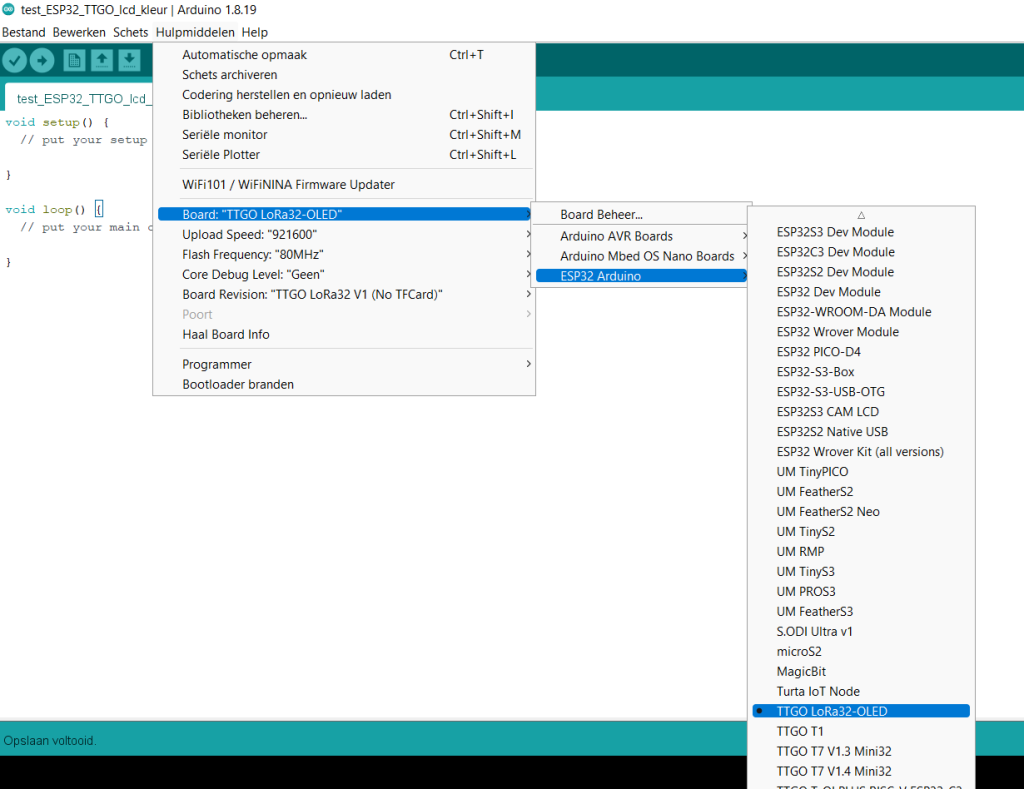
De ingestelde parameters voor de seriele monitor, de flashfrequentie , het debuglevel en de versie van het board verschijnen nu in het menu
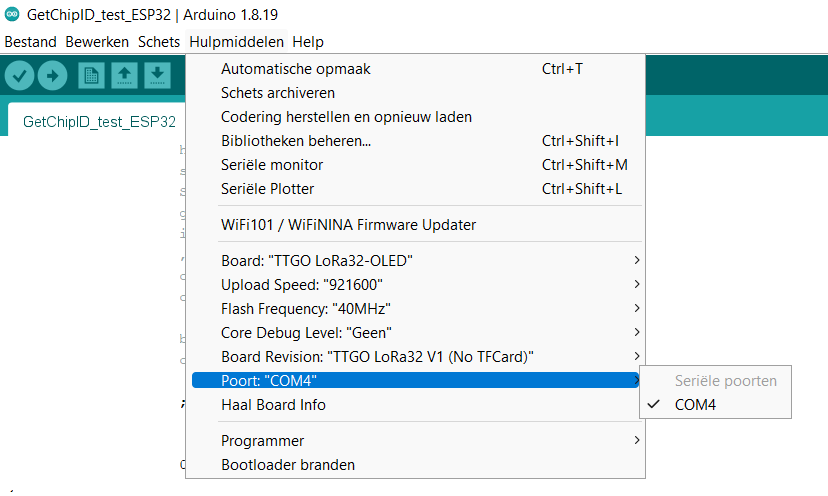
6. Verbind het ESP32 TTGO board via de USB-C naar USB-A kabel met de PC, welke reageert met een ‘pling’. Stel nu de beschikbare communicatiepoort COMx:
Menu : Hulpmiddelen – Poort
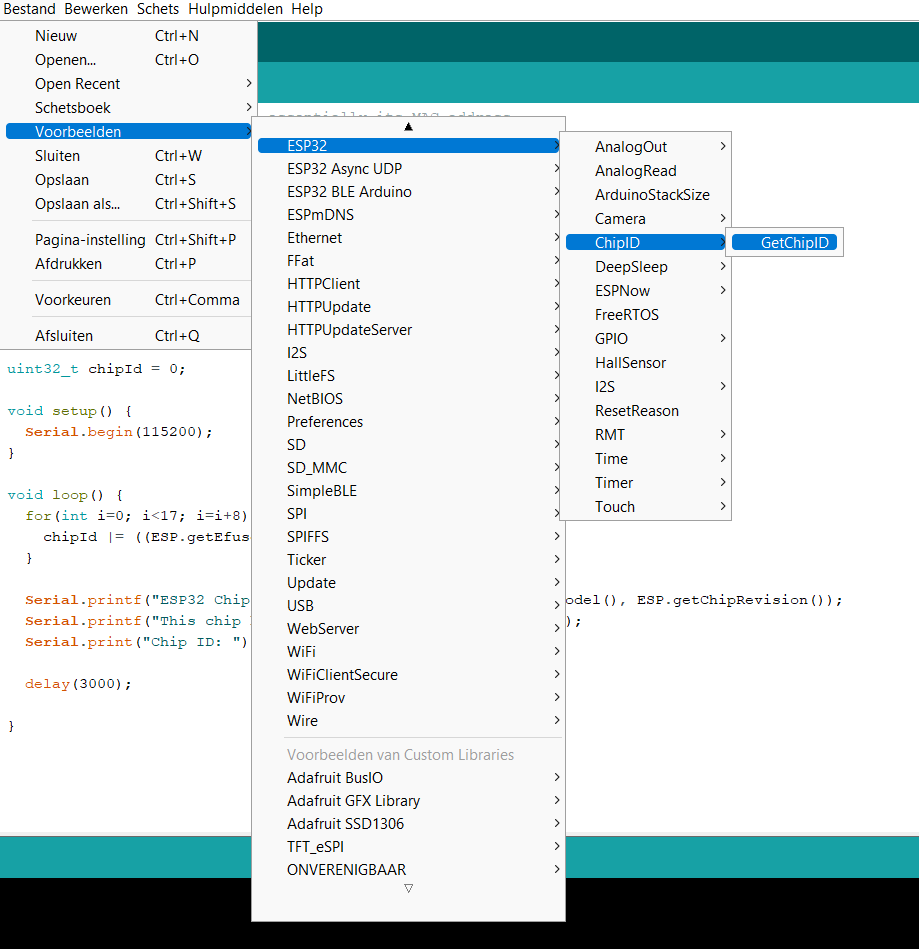
7. Laad een voorbeeld programma (sketch) om te testen of communicatie met de ESP32 microcontroller werkt via het menu : Bestand – Voorbeelden – ESP32 – Chip ID – Get Chip ID
Start de sketch via de upload-knop.
Het compileren en opladen naar de microcontroller duurt even.
De melding onderaan in het scherm : ‘upload completed’
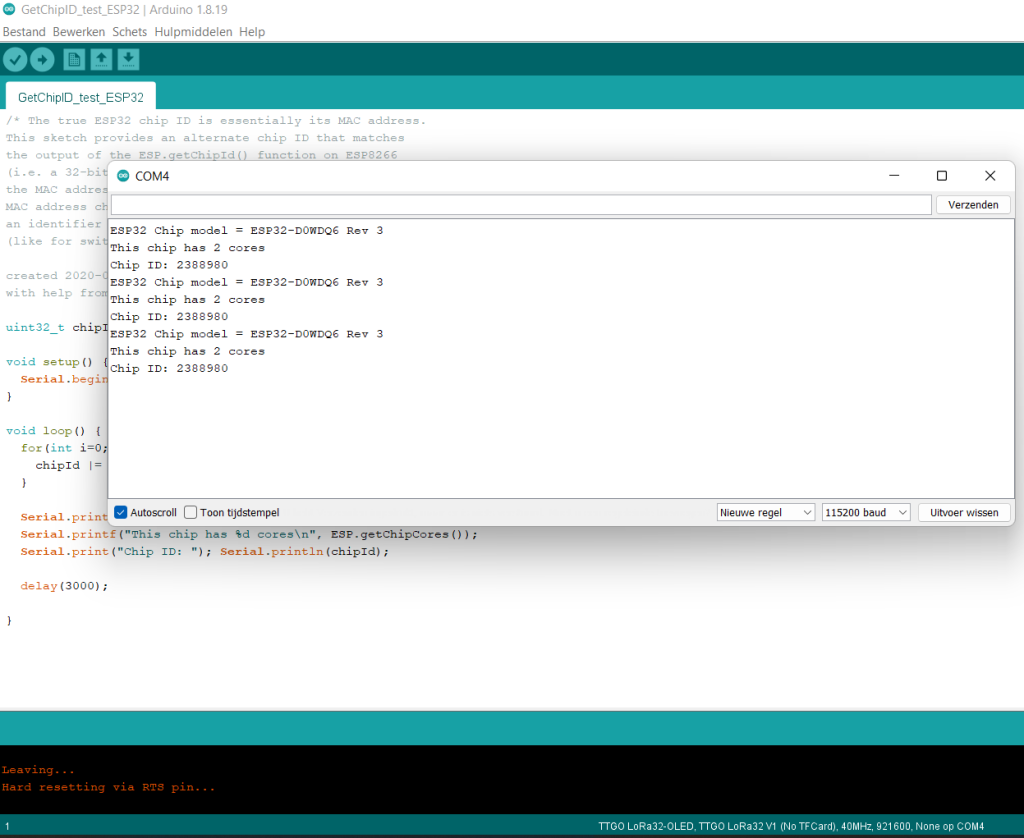
Open de seriële monitor via het menu : Hulpmiddelen – Seriele Monitor
Op het scherm verschijnen nu de ID-gegevens van het ESP32 TTGO board
8. We gaan nu de hulpbestanden installeren om met de TFT Oled kleurendisplay te kunnen werken.
Menu : Tools – Bibliotheken beheren …
Type in het zoekkader : tft-espi
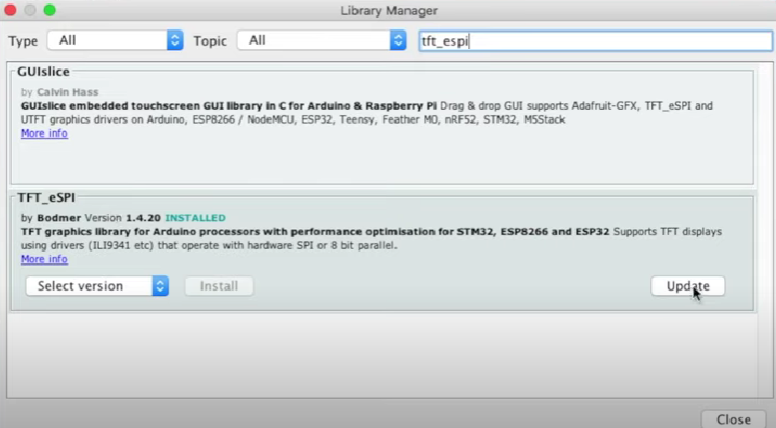
Kies de bibliotheek: ‘TFT_eSPI by Bodmer‘ en druk op de knop INSTALLEREN.
9. Al laatste stap moet men het setup-bestand voor de display-driver aanpassen.
Ga naar de directory waar de bibliotheken van de Arduino software staan:
c:\documenten\Arduino\libraries\TFT-eSPI\User_Setup_Select.h
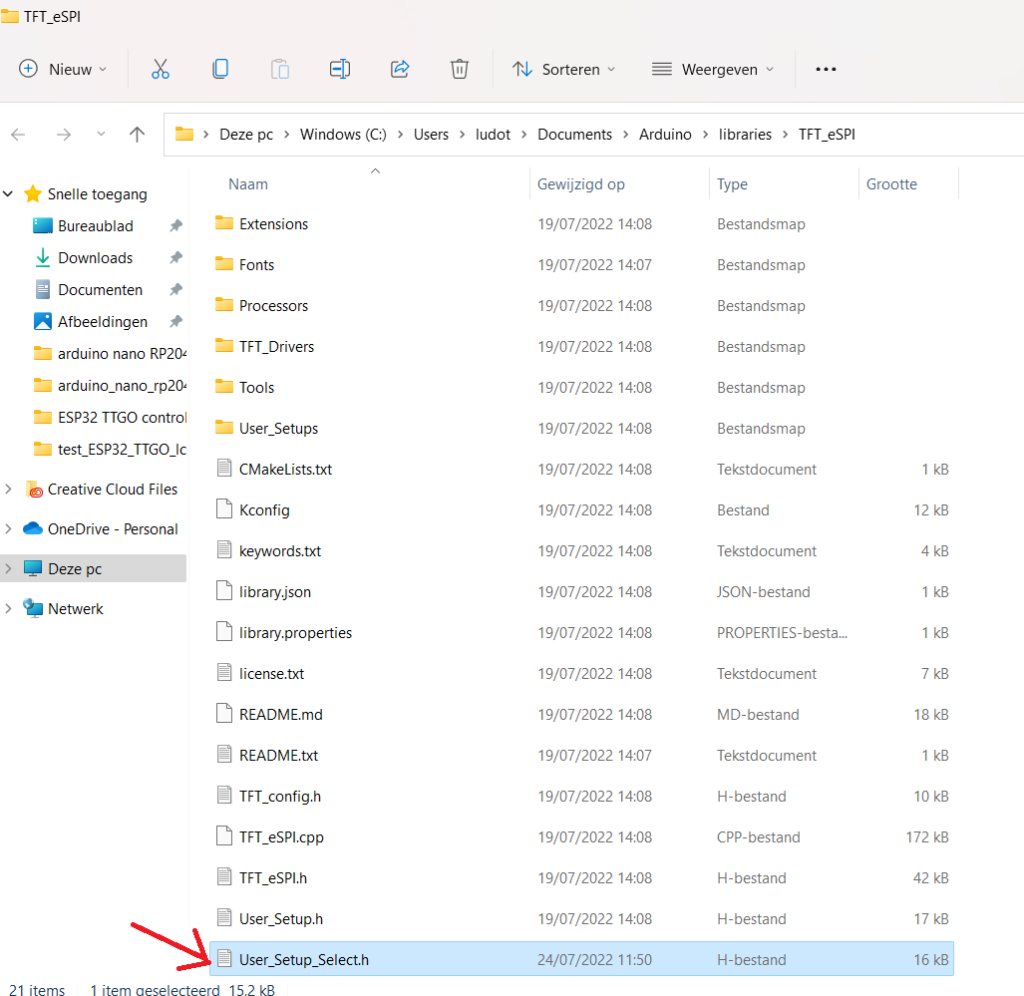
Open dit bestand met de Notepad (Kladblok) teksteditor.
Pas 2 regels in tekst aan :
– Zet twee schuine strepen aan het begin van de regel (uitmarkeren = // er voor plaatsen)
// #include <User_Setup.h>
– Verwijder de twee schuine strepen aan het begin van de regel
#include <User_Setups/Setup25_TTGO_T_Display.h>
Sla het gewijzigde bestand op.
10. Laad een voorbeeld bestand om de werking van de grafische kleurendisplay te testen
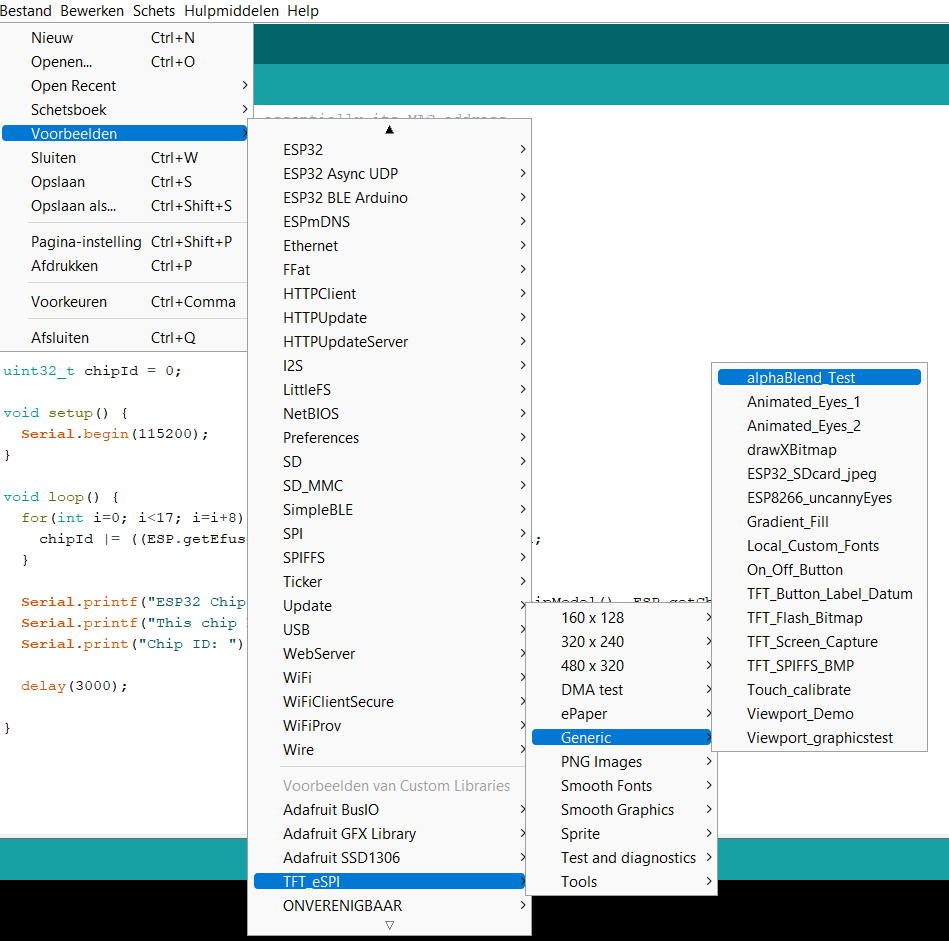
Menu: Bestand – Voorbeelden – Voorbeelden voor Custom Libraries – TFT_eSPI – Generic – AlphaBlend_Test
Laad dit programma naar de ESP32 TTGO en wacht tot het opladen klaar is.
Druk op de resetknop van het board. De display toont nu de overgang naar verschillende kleuren.
Dit is de programmacode voor de displaytest. Deze zet de 16 hoofdkleuren op het scherm.
/*
This tests the alpha blending function that is used with the anti-aliased
fonts:
Alpha = 0 = 100% background, alpha = 255 = 100% foreground colour
blendedColor = tft.alphaBlend(alpha, fg_color, bg_color);
The alphaBlend() function operates on 16 bit colours only
A test is included where the colours are mapped to 8 bits after blending
Information on alpha blending is here
https://en.wikipedia.org/wiki/Alpha_compositing
Example for library:
https://github.com/Bodmer/TFT_eSPI
The sketch has been tested on a 320×240 ILI9341 based TFT, it
could be adapted for other screen sizes.
Created by Bodmer 10/2/18
#########################################################################
###### DON’T FORGET TO UPDATE THE User_Setup.h FILE IN THE LIBRARY ######
#########################################################################
*/
include // Include the graphics library
TFT_eSPI tft = TFT_eSPI(); // Create object “tft”
// ————————————————————————-
// Setup
// ————————————————————————-
void setup(void) {
tft.init();
tft.setRotation(0);
tft.fillScreen(TFT_DARKGREY);
}
// ————————————————————————-
// Main loop
// ————————————————————————-
void loop()
{
// 16 bit colours (5 bits red, 6 bits green, 5 bits blue)
// Blend from white to full spectrum
for (int a = 0; a < 256; a+=2) // Alpha 0 = 100% background, alpha 255 = 100% foreground
{
for (int c = 0; c < 192; c++) tft.drawPixel(c, a/2, tft.alphaBlend(a, rainbow(c), TFT_WHITE));
}
// Blend from full spectrum to black
for (int a = 255; a > 2; a-=2)
{
for (int c = 0; c < 192; c++) tft.drawPixel(c, 128 + (255-a)/2, tft.alphaBlend(a, rainbow(c), TFT_BLACK));
}
// Blend from white to black (32 grey levels)
for (uint16_t a = 0; a < 255; a++) // Alpha 0 = 100% background, alpha 255 = 100% foreground
{
tft.drawFastHLine(192, a, 12, tft.alphaBlend(a, TFT_BLACK, TFT_WHITE));
tft.drawFastHLine(204, a, 12, tft.alphaBlend(a, TFT_BLACK, TFT_RED));
tft.drawFastHLine(216, a, 12, tft.alphaBlend(a, TFT_BLACK, TFT_GREEN));
tft.drawFastHLine(228, a, 12, tft.alphaBlend(a, TFT_BLACK, TFT_BLUE));
}
delay(2000); // 2 seconden
// Blend from white to colour (32 grey levels)
for (uint16_t a = 0; a < 255; a++) // Alpha 0 = 100% background, alpha 255 = 100% foreground
{
//tft.drawFastHLine(192, a, 12, tft.alphaBlend(a, TFT_BLACK, TFT_WHITE));
tft.drawFastHLine(204, a, 12, tft.alphaBlend(a, TFT_RED, TFT_WHITE));
tft.drawFastHLine(216, a, 12, tft.alphaBlend(a, TFT_GREEN, TFT_WHITE));
tft.drawFastHLine(228, a, 12, tft.alphaBlend(a, TFT_BLUE, TFT_WHITE));
}
delay(4000);
//*
// Decrease to 8 bit colour (3 bits red, 3 bits green, 2 bits blue)
// Blend from white to full spectrum
for (int a = 0; a < 256; a+=2) // Alpha 0 = 100% background, alpha 255 = 100% foreground
{
// Convert blended 16 bit colour to 8 bits to reduce colour resolution, then map back to 16 bits for displaying
for (int c = 0; c < 192; c++) tft.drawPixel(c, a/2, tft.color8to16(tft.color16to8(tft.alphaBlend(a, rainbow(c), 0xFFFF))));
}
// Blend from full spectrum to black
for (int a = 255; a > 2; a-=2)
{
// Convert blended 16 bit colour to 8 bits to reduce colour resolution, then map back to 16 bits for displaying
for (int c = 0; c < 192; c++) tft.drawPixel(c, 128 + (255-a)/2, tft.color8to16(tft.color16to8(tft.alphaBlend(a, rainbow(c), 0))));
}
// Blend from white to black (4 grey levels – it will draw 4 more with a blue tinge due to lower blue bit count)
// Blend from black to a primary colour
for (uint16_t a = 0; a < 255; a++) // Alpha 0 = 100% background, alpha 255 = 100% foreground
{
tft.drawFastHLine(192, a, 12, tft.color8to16(tft.color16to8(tft.alphaBlend(a, TFT_BLACK, TFT_WHITE))));
tft.drawFastHLine(204, a, 12, tft.color8to16(tft.color16to8(tft.alphaBlend(a, TFT_BLACK, TFT_RED))));
tft.drawFastHLine(216, a, 12, tft.color8to16(tft.color16to8(tft.alphaBlend(a, TFT_BLACK, TFT_GREEN))));
tft.drawFastHLine(228, a, 12, tft.color8to16(tft.color16to8(tft.alphaBlend(a, TFT_BLACK, TFT_BLUE))));
}
delay(4000);
//*/
/*
// 16 bit colours (5 bits red, 6 bits green, 5 bits blue)
for (int a = 0; a < 256; a+=2) // Alpha 0 = 100% background, alpha 255 = 100% foreground
{
for (int c = 0; c < 192; c++) tft.drawPixel(c, a/2, tft.alphaBlend(a, rainbow(c), TFT_CYAN));
}
// Blend from full spectrum to cyan
for (int a = 255; a > 2; a-=2)
{
for (int c = 0; c < 192; c++) tft.drawPixel(c, 128 + (255-a)/2, tft.alphaBlend(a, rainbow(c), TFT_YELLOW));
}
//*/
/*
// Blend other colour transitions for test purposes
for (uint16_t a = 0; a < 255; a++) // Alpha 0 = 100% background, alpha 255 = 100% foreground
{
tft.drawFastHLine(192, a, 12, tft.alphaBlend(a, TFT_WHITE, TFT_WHITE)); // Should show as solid white
tft.drawFastHLine(204, a, 12, tft.alphaBlend(a, TFT_BLACK, TFT_BLACK)); // Should show as solid black
tft.drawFastHLine(216, a, 12, tft.alphaBlend(a, TFT_YELLOW, TFT_CYAN)); // Brightness should be fairly even
tft.drawFastHLine(228, a, 12, tft.alphaBlend(a, TFT_CYAN, TFT_MAGENTA));// Brightness should be fairly even
}
delay(4000);
//*/
}
// #########################################################################
// Return a 16 bit rainbow colour
// #########################################################################
unsigned int rainbow(byte value)
{
// If ‘value’ is in the range 0-159 it is converted to a spectrum colour
// from 0 = red through to 127 = blue to 159 = violet
// Extending the range to 0-191 adds a further violet to red band
value = value%192;
byte red = 0; // Red is the top 5 bits of a 16 bit colour value
byte green = 0; // Green is the middle 6 bits, but only top 5 bits used here
byte blue = 0; // Blue is the bottom 5 bits
byte sector = value >> 5;
byte amplit = value & 0x1F;
switch (sector)
{
case 0:
red = 0x1F;
green = amplit; // Green ramps up
blue = 0;
break;
case 1:
red = 0x1F – amplit; // Red ramps down
green = 0x1F;
blue = 0;
break;
case 2:
red = 0;
green = 0x1F;
blue = amplit; // Blue ramps up
break;
case 3:
red = 0;
green = 0x1F – amplit; // Green ramps down
blue = 0x1F;
break;
case 4:
red = amplit; // Red ramps up
green = 0;
blue = 0x1F;
break;
case 5:
red = 0x1F;
green = 0;
blue = 0x1F – amplit; // Blue ramps down
break;
}
return red << 11 | green << 6 | blue;
}
